 0
0 0
0
 0
0 0
0


Even if you have large windows, when it’s a dark cloudy day, you need extra reflectors to get enough light bouncing back onto the front of the food when you are using backlighting.
Backlighting is my favourite light direction for food because it makes the surface of food shiny which really makes a difference in photos. It refers to when you shoot with the light coming from behind the food ie. you are shooting from a 6 o’clock position, then the light is coming from around the 11 – 1 o’clock position. You can read more about backlighting and how it makes food look better in this post: How to Make Your Food Shine.
The main challenge that people tell me they face with backlighting is how to get enough light onto the front of the food (the direction you are shooting from) without the reflector getting in the way of the shot. And on a cloudy day, it’s just about as challenging as it gets!
So here’s how I set up a backlit shot on a cloudy day.
1. Use reflectors on 3 sides. You need extra reflectors on dark, cloudy days because there is less light so you need more “surface area” (so to speak!) for the light to bounce back from onto the food.
2. Position the reflectors on the left and right as close as you can to the front of the food without getting in the way of your lens. Basically, you just want to create the smallest gap you can to shoot “through”.
3. Use a low reflector directly in front of your camera. That way you can shoot over it. Make it as high as you can without it getting in the way! I use foam blocks which was the packing material for an appliance I got. They are perfect for using as reflectors because they are bright white AND they come in different sizes so you can stack them like lego and build different size “reflectors”!
4. Camera Settings – f/3.2, shutter speed 1/250, ISO 500. Note: I use a 50mm f/1.8 prime lens. Your settings will differ depending on the lens
5. Increase your ISO. The higher your ISO, the higher your shutter speed because your camera draws in more light. BUT you need to be mindful that the higher the ISO, the less sharp (i.e. more grainy) your photos will be. This is NOT a deal breaker for food bloggers where our images are only online but it does matter for when photos are used for high res purposes, like in print.
By default, I keep my ISO at 250 (i.e. lower = less grainy) and I only adjust it in lower light situations like this. I increased it to ISO 500 for this shot. I don’t like to go above ISO 750 as I find higher than this causes graininess in photos that I can see in photos on my blog. 🙂 But that’s a personal thing and I do not discourage people from going higher than ISO 75o if that means being able to use a shutter speed fast enough so that the image isn’t blurry! (This is a key tip for people who don’t use a tripod).
*****
The reflectors I use are all “homemade.” The right one is white foam cardboard. The one in front is foam blocks (2 stacked on top of each other – see point #3). And the one on the left is the box my Macbook came in! It’s really handy to use as a reflector because it stays upright on it’s side which means I can fit it in even when space is tight. 🙂
PS This set up shot was taken with an iPhone, so please excuse the quality!

KEY TIP:
You won’t need as many reflectors on a bright day! It will bounce so much light back onto the food, it will look like you’re using a flash! YES there is such think as too much light. It makes food photos look like “product shots”. i.e. so brightly illuminated on all sides you lose contours and shadows which help make the colours in food pop!
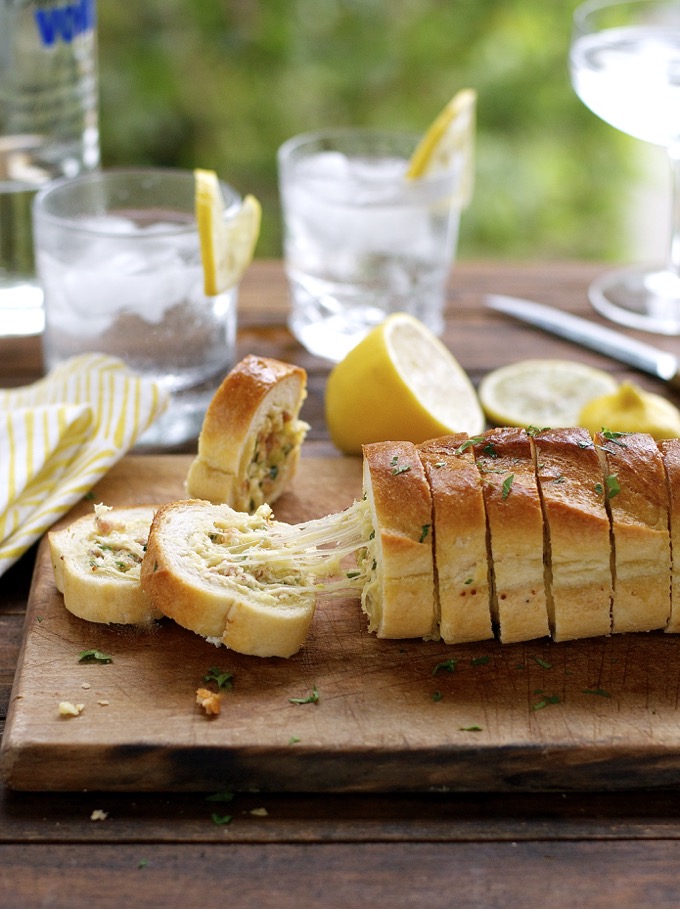
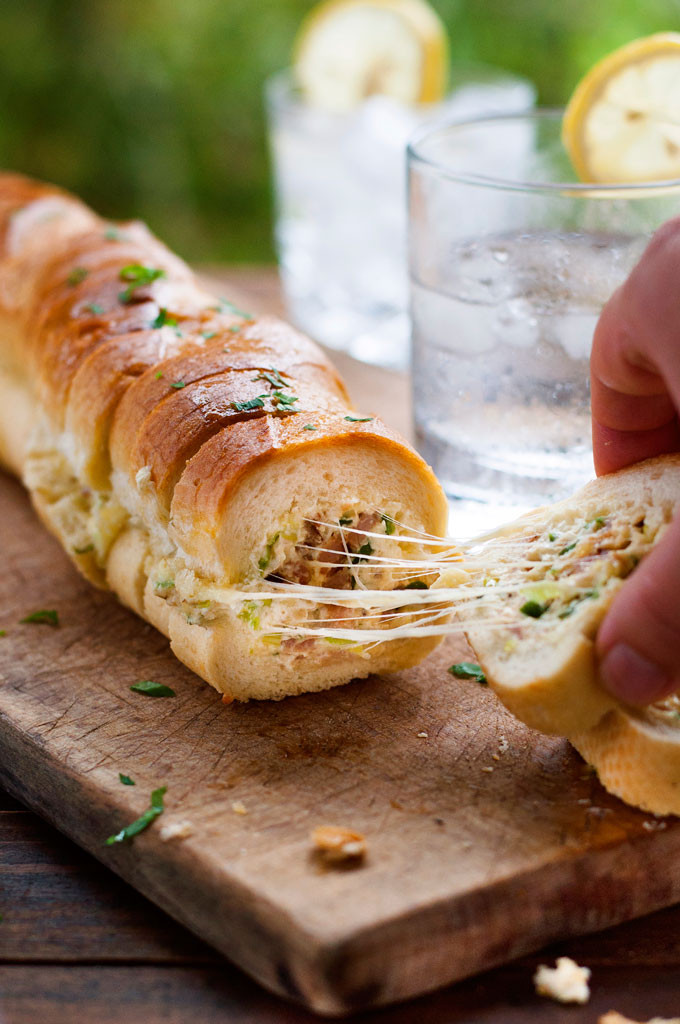
And the end result? Here we go! – Nagi
 0000
0000
Your shots are amazing! I’m working with 10 days of rain right now, so I’m going to see what I can get done. Thanks for the info!
I just found your blog yesterday and I’ve read about 6 or 7 posts already! I’m hooked. I will be referring back. Thank you Thank you for the great tips!
I’m just starting out and your blog is a GOD SEND. You just have all the answer I need and few that I didn’t even know that I needed. Thank you for sharing so openly and succinctly.
This is an awesome, and very helpful post! I love it! Do you have any advice for not so pretty backgrounds? I don’t have pretty greens to blend in with my photos! 🙂
Hi Marsha – so glad you find this useful! Just shoot with the light coming from a little more to the side so you can use a background, or shoot with a higher angle so you get less of what is behind the food. 🙂
I’m so happy to find your blog Nagi..
Blessing in disguise for a new blogger like me
Cannot thank you enough for all the useful resources 🙂
Hi Arunima!! I’m SO GLAD you are finding it useful! I’m happy to share 🙂
So glad I found this site! I have already gleaned useful tips and look forward to more from you. Thank you so much Nagi for al the invaluable helps! So practical!
How is it that I haven’t discovered this other blog of yours until today! This is so awesome. Backlighting has always been one of my biggest challenges. I am really looking forward to reading all of your old posts. Thanks for this site.
Thanks Nagi! I run into cloudy days far more than I like and always looking for tips to help enhance the natural light.
No worries! Happy to be of help 🙂
Great post, Nagi!
Thanks Lizzy, glad you found it helpful 🙂
I like this setup. I have almost no windows with access to good light. I’ve got concrete walls in the front and a huge overhang in the back. I refuse to shoot in the bathroom. I’ll try this setup and see how it goes. Thanks a lot!
You are actually lucky Maureen. My house is open plan and has light streaming in from everywhere. REDUCING light is much harder than creating it! 🙂
Thanks for this informative post! May I ask what your recommendation is for a tripod? Also, when shooting at shutter speeds that are greater than, say 1/30 to 1/60, do you still find it necessary to use a tripod and if so, why? Thank so much, once again.
Hi Dan! I use a hand me down tripod so I can’t recommend one. BUT Christina Peters has some recommendations – she is a professional food photographer and I really value her recommendations. Have a read of this – she talks through things to consider for selecting a tripod and recommends her picks. http://foodphotographyblog.com/the-best-equipment-and-software-for-photographing-food/
I am still drooling over the cheese.. 😀
But amazing set up.. It looks as if it is shot outside on a lovely morning.. Extremely helpful..
best advice yet (via web)! I find it difficult when I use bounce boards to get the right amount of light on the food w out way over washing the back ground. Advice?
I think that means you don’t have enough light to bounce off the reflectors bak onto your food, so you food is still too dark so when you brighten the whole photo in order to get the FOOD bright enough, you blow out the background. Which is actually a particular style that can look really good! But if you want to learn a neat trick for how to increase the brightness of just your food without blowing out the background, checkout the Nicole Branan’s book http://thespicetrain.com/food-photography-behind-the-scenes-bright-food-dark-shadows/ She explains how to use Photoshop adjustment tools to increase exposure of the food only! BEST photography book I have ever gotten, so practical!